Many people want to build stronger glutes, support their hips, and move with confidence again, but the moment squats or lunges hit the program, their knees wave the white flag.
Here’s the twist: skipping glute training because of knee pain is actually working against you.
Strong, active glutes aren’t the problem. They’re part of the fix.
When they fire the way they should, they take pressure off your knees, improve joint alignment, and reduce your risk of future injury.
In this article, you’ll learn why glute strength is so critical for knee health and discover 10 knee-friendly glute exercises you can start using today. No painful lunges or deep squats required.
Why Strong Glutes Are Essential for Knee Health
Your gluteal muscles—the gluteus maximus, medius, and minimus—do far more than just power your hips. They stabilize the pelvis, guide proper leg movement, and help keep your knees tracking in a safe, efficient line.
When your glutes are strong and firing correctly, they act like built-in shock absorbers, spreading impact forces evenly through your lower body instead of letting them concentrate in the knees.
But when your glutes are weak or inactive, your body finds other ways to complete the movement.
Often, that “workaround” shifts the load to the knees, forcing them to take on stress they weren’t designed to handle.
Patellofemoral Pain Syndrome (Runner’s Knee): Weak glutes can allow the thigh to rotate inward, causing the kneecap to track poorly and leading to irritation and pain in the front of the knee.
IT Band Syndrome: Without strong lateral hip stability from the gluteus medius, the iliotibial band can tighten and rub against surrounding tissue, creating friction and discomfort along the outside of the knee.
ACL Strain and Instability: Poor glute activation can cause the knee to collapse inward during dynamic movements, increasing strain on the anterior cruciate ligament and raising the risk of injury.
The takeaway? Strong, well-activated glutes don’t just look good. They’re essential for keeping your knees stable, pain-free, and injury-resistant.
Why Traditional Glute Exercises Can Backfire
Once people learn that stronger glutes can support healthier knees, they often turn to the most popular lower-body moves such as squats, lunges, and step-ups.
These exercises can be great for building glute strength, but they come with a catch: they’re knee-dominant, meaning a large portion of the movement depends on bending and loading the knee joint.
For someone with knee pain or sensitivity, that extra demand can quickly turn a helpful exercise into a painful one.
The real difference comes down to movement mechanics:
Knee-Dominant Exercises: Movements like squats, lunges, and leg presses require significant knee flexion and put more load on the quadriceps. While they can still engage the glutes, the knees take on a bigger share of the work.
Hip-Dominant Exercises: Movements like glute bridges, hip thrusts, Romanian deadlifts, and good mornings focus on hinging at the hips rather than bending deeply at the knees. This shifts the workload toward the glutes and hamstrings while reducing stress on the knee joint.
If you’re dealing with knee sensitivity, hip-dominant exercises paired with proper form are your safest bet.
They allow you to strengthen the posterior chain, including the glutes, hamstrings, and lower back, without forcing your knees into deep or repetitive bends that could aggravate pain.
Over time, this not only builds a stronger lower body but also creates the stability your knees need to function more comfortably.
10 Knee-Friendly Exercises to Grow Your Glutes (No Equipment Needed)
You don’t need a gym (or perfect knees) to build strong, powerful glutes.
By choosing the right movements, you can target your glute muscles while keeping stress off sensitive joints.
The following 10 bodyweight exercises are designed to activate and strengthen your glutes using hip-dominant patterns and controlled ranges of motion, so you can train effectively anywhere, without aggravating knee pain.
1. Alternating Side Standing Leg Raises
Instructions:
Keep your feet hip-width apart and stand straight, hands on hips or lightly resting on a chair for balance.
Shift your weight onto one leg and lift the opposite leg out to the side with slow control.
Engage your core the whole time, then carefully lower your leg and repeat on the other leg too.
Sets & Reps: 2–3 sets of 12–15 reps per leg
Safety Notes: Avoid leaning to the side or using momentum to swing the leg. The movement should come from your glutes, not your lower back or hips.
Progression Options:
Use a resistance band around your thighs.
Pause briefly at the top of each raise.
2. Alternating Side Laying Leg Circles
Instructions:
Rest on one side with both legs extended and stacked.
Use the lower arm to support your head and then lift the top leg slightly.
Trace small, controlled circles in the air and engage your core.
Repeat on the other side after a full set.
Sets & Reps: 2 sets per side of 10–12 circles clockwise then 10–12 counterclockwise
Safety Notes: Avoid letting your hips roll back and focus on slow, precise movement to engage the glutes fully.
Progression Options:
Add a resistance band around your thighs.
Increase the circle size slightly as strength improves.
If you’re interested, you can add different side glute exercises into your routine.
3. Bridge Marching
Instructions:
Lie on your back, keep your feet hip-width apart, and bend your knees. Lift your hips into a glute bridge.
While holding this position, lift one foot a few inches off the ground, keeping the knee bent at 90 degrees.
Lower it with control, then switch legs, like a slow, marching motion.
Sets & Reps: 2–3 sets of 10–12 marches per leg
Safety Notes: Keep your hips level throughout. Don’t let them drop or twist as you lift each foot.
Progression Options:
Add a resistance band just above your knees.
Increase the pause time at the top of each march.
4. Glute Bridge Leg Abductions
Instructions:
Lie on your back with knees bent and a resistance band around your thighs.
Press your feet into the floor and lift your hips into a glute bridge.
Once lifted, gently push your knees outward (abduction), hold for a second, then return to neutral.
Lower your hips only after completing all reps.
Sets & Reps: 2–3 sets of 10–15 abductions per set
Safety Notes: Avoid arching your back. Focus on pushing out from the sides of your hips, not just forcing your knees wide.
Progression Options:
Add a short hold at the peak of each abduction.
Perform slow, controlled pulses for extra burn.
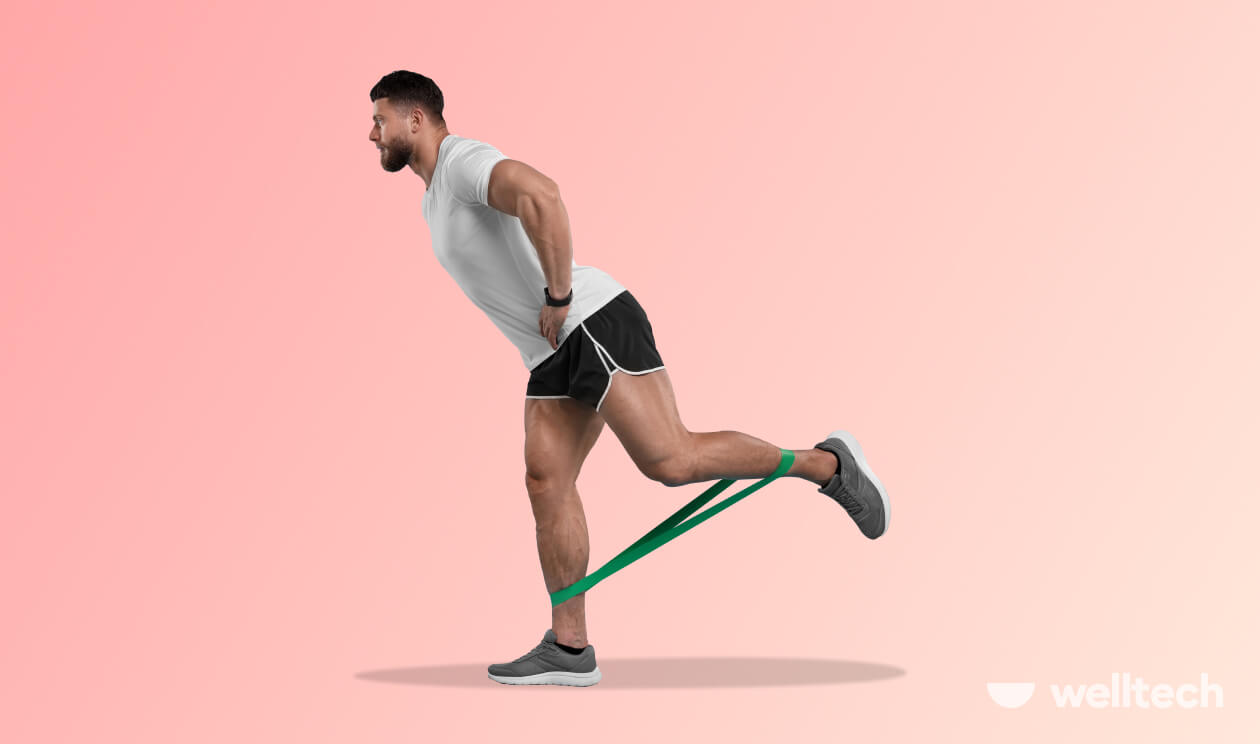
5. Kickback
Instructions:
Stand upright and use a wall for support.
With a slight forward lean and soft knees, extend one leg straight back while keeping your core engaged and hips square.
Squeeze your glute at the top, then return to start.
After completing reps on one side, switch to the other.
Sets & Reps: 2–3 sets of 12–15 reps per leg
Safety Notes: Avoid arching your lower back, as the movement should come from the hip. Keep the standing leg stable but not locked.
Progression Options:
Add a resistance band around your thighs.
Each rep, pause at the top for 1–2 seconds.
6. Seated Dumbbell Hip Hinge
Instructions:
Sit on the edge of a bench with feet flat and hip-width apart.
With both hands, hold a dumbbell between your legs and bend forward from the hips.
Hold your spine long and chest open.
Lower the dumbbell toward the floor, then go upright again by driving through your glutes.
Sets & Reps: 2–3 sets of 10–12 reps
Safety Notes: Avoid rounding your back or collapsing your chest.
Progression Options:
Use a heavier dumbbell as strength improves.
Slow the tempo for added control.
7. Glute Bridge
Instructions:
Position yourself on your back and bend your knees.
Hold a kettlebell or dumbbell over your hips and lift your hips through a heel-press.
Your body should form a straight line from shoulders to knees.
Squeeze your glutes at the top, then lower slowly.
Sets & Reps: 2–3 sets of 12–15 reps
Safety Notes: Avoid pushing from your lower back. Keep knees aligned with your hips and ankles throughout.
Progression Options:
Increase the weight gradually as you get stronger.
Add a 2–3 second pause at the top.
8. Dumbbell Bent-Knee Good Mornings
Instructions:
Stand with feet shoulder-width apart, a soft bend in your knees, and hold a dumbbell to your chest.
Hinge forward from the hips, keeping your spine neutral and chest open.
Lower until your torso is nearly parallel to the ground, then return to standing.
Sets & Reps: 2–3 sets of 10–12 reps
Safety Notes: Maintain a straight spine and maintain the bend in your knees without squatting.
Step one foot slightly back, so only the toes touch the ground. Your front leg does most of the work.
Hinge at the hips, lowering the kettlebell along your front leg with a flat back, then return to a standing position.
Sets & Reps: 2–3 sets of 8–10 reps per leg
Safety Notes: Keep your spine long and hips square.
Progression Options:
Increase the kettlebell weight.
Slow the lowering phase.
10. Glute Stretch
Instructions:
Lie on your back with knees bent. Cross one ankle over the opposite thigh.
Thread your hands behind the supporting thigh and gently pull it toward your chest.
Hold the stretch, then switch sides.
Sets & Reps: Hold for 30–60 seconds per side then repeat 1–2 times
Safety Notes: Keep your head and shoulders relaxed on the floor.
Progression Options:
Use a yoga strap behind the thigh for assistance.
Add small rocking motions side-to-side.
4 Tips for Saving Your Knees During Glute Workouts
Training your glutes shouldn’t come at the expense of your knees.
The right technique and smart adjustments can help you build strength while keeping joint stress to a minimum.
These four tips will show you how to protect your knees, avoid common mistakes, and get the most out of every glute-focused session.
1. Master the Hip Hinge Pattern
One of the most important movement patterns for knee-friendly training is the hip hinge, because this mechanic actually shifts the movement into your glutes and hamstrings.
This pattern forms the base of many glute exercises, as it trains the posterior chain while minimizing joint compression.
Imagine closing a car door with your hips or folding at your hips while keeping your spine long and your knees soft.
2. Progress Gradually and Listen to Your Body
It’s tempting to chase quick results, especially when dealing with pain or recovering from injury.
But rushing progress is rarely worth the cost.
Start with bodyweight exercises and build a solid foundation of movement control before adding weights or resistance.
Focus on slow, controlled reps that prioritize form over intensity. If at any point you feel sudden, sharp pain, stop and reassess.
3. Create a Warm-Up Routine
Don’t underestimate the value of a well-crafted warm-up: it primes your joints, boosts circulation, and wakes up dormant glutes.
A knee-friendly warm-up could include:
dynamic stretches, like leg swings or hip circles
glute activation drills, such as glute bridges or banded clamshells
Knee pain doesn’t have to put your lower-body goals on hold. It simply requires a smarter approach.
By choosing joint-friendly exercises and paying attention to form, you can strengthen and shape your glutes without adding unnecessary stress to your knees.
The goal is simple: move away from pain and toward strength, stability, and lasting function.
Glute training goes beyond aesthetics. It’s about building a body that supports you in every step, climb, and lift you take.
This article is intended for general informational purposes only and does not address individual circumstances. It is not a substitute for professional advice or help and should not be relied on to make decisions of any kind. Any action you take upon the information presented in this article is strictly at your own risk and responsibility!