If you've ever tried to knock out a push-up and ended up face-planting into your mat instead, you're not alone. And you're not weak. Your muscles just need to learn how all the parts work together.
Push-ups demand coordination, control, and strength from your chest, shoulders, triceps, and core all at once. That's a lot to ask from muscles that might not be used to working together.
The good news? With the right technique and progressions, anyone can build up to a solid push-up.
A traditional push-up asks you to lift about 60-70% of your body weight. If you're new to upper body training or haven't donestrength training consistently, that's a big ask right out of the gate.
Your chest (pecs), shoulders (delts), and triceps need to fire in sync while your core keeps your body stable. If any of these muscle groups is undertrained, the whole movement falls apart.
It's not a reflection of your worth or your fitness potential. Just physics.
So, should you keep struggling through bad push-ups until it “feels right” or ditch the exercise entirely?
Neither. Just meet your body where it is and building from there.
For a personalized approach to building upper body strength and workout plans that progress with you, try the Muscle Booster app.
The 3 Push-Up Variations That Work For Everyone
These three techniques let you build strength gradually while keeping proper form front and center. Work through them in order, and you'll notice the difference in weeks.
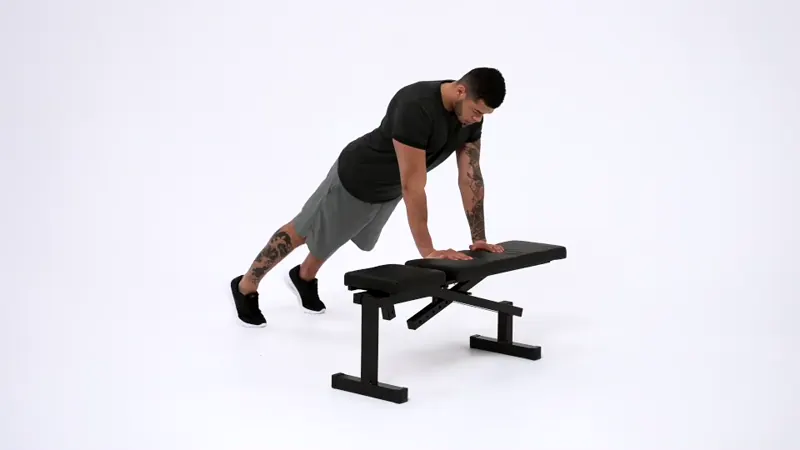
Incline Push-Ups
This is where most beginners should start. By elevating your hands on a bench, box, or even a sturdy countertop, you reduce the amount of body weight you're lifting while still training the same muscles.
Place your hands on an elevated surface, slightly wider than shoulder-width apart
Step your feet back until your body forms a straight line from head to heels
Engage your core and slowly lower your chest toward the surface
Press back up through your hands, keeping your elbows at about a 45-degree angle
Why it works: Incline push-ups let you focus on form without getting crushed by the full load. You're still engaging your pecs, delts, and triceps, but with less resistance. As you get stronger, gradually lower the surface height until you're working from the floor.
Knee Push-Ups
Once incline push-ups feel manageable, knee push-ups are your next step. This variation reduces the body weight you're lifting by about 40% while bringing you closer to the floor.
How to do it:
Start in a plank position with your knees on the ground, positioned underneath your hips
Place your hands shoulder-width apart
Engage your core and lower your chest toward the floor in a controlled motion
Press back up, keeping tension in your chest, shoulders, and core throughout
Why it works: Knee push-ups teach your body the full range of motion you'll need for a traditional push-up. They also build endurance in your stabilizing muscles, which is crucial for progression.
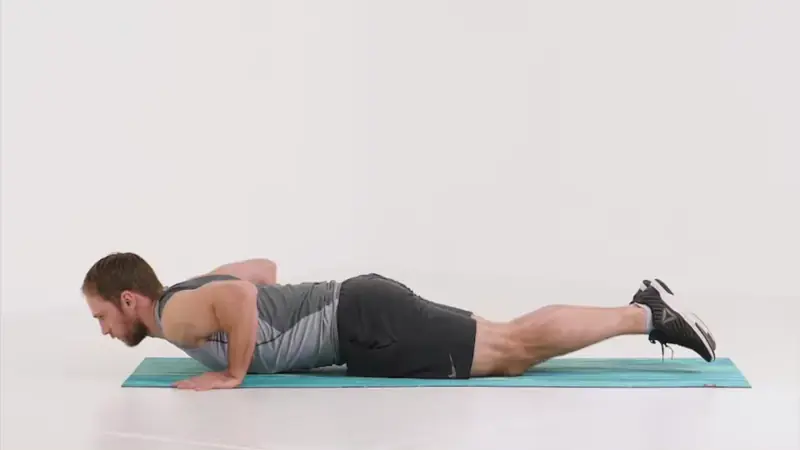
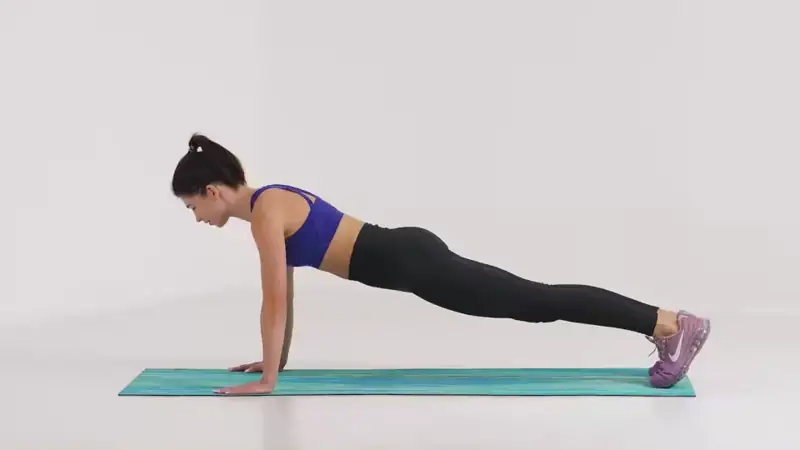
Traditional Push-Ups
This is the classic move, and by the time you reach it, you'll have built the strength and control to do it right.
How to do it:
Start in a high plank position with hands slightly wider than shoulder-width and feet hip-width apart
Keep your body in a straight line from head to heels by engaging your core and glutes
Lower your chest toward the floor in a slow, controlled motion
Press through your palms to return to the starting position without letting your hips sag or your back arch
Why it works: Once you can perform traditional push-ups with control, you're building seriousfunctional strength that carries over into everyday life, whether you're pushing open a heavy door or hoisting yourself up from the floor.
Dead Stop Push-Ups (Advanced Option)
If you've mastered traditional push-ups and you're up for a challenge, dead stop push-ups take things to the next level. By eliminating all momentum, you force your muscles to work significantly harder.
How to do it:
Start in a high plank position with hands slightly wider than shoulder-width apart
Lower your body all the way to the ground in a controlled motion
Stop completely at the bottom — your chest, stomach, and thighs should touch the floor
Pause for a full second, then push yourself back up to the starting position without using any bounce or momentum
Reset completely at the top before your next rep
Why it works: Dead stop push-ups eliminate the stretch reflex that normally helps you bounce out of the bottom position. This means your chest, shoulders, and triceps have to generate all the force from zero, building explosive strength and serious muscle control.
How to Progress Through the Variations
Don't rush through these steps. The goal isn't to race to a traditional push-up; it's to build strength that lasts.
Start with incline push-ups and aim for 3 sets of 8-12 reps with good form.
When that feels manageable, lower your incline or move to knee push-ups.
From there, work up to 3 sets of 10-15 knee push-ups before attempting traditional ones.
Track your progress. Notice when movements that once felt impossible start to feel controlled. That's your body adapting, and it's worth celebrating.
What If You're Still Struggling?
If you've been working through these progressions but still can't nail a push-up, a few factors might be at play.
Core weakness: Push-ups demand seriouscore stability. If your hips sag or your back arches, your core might need some extra attention. Try adding planks and dead bugs to your routine.
Shoulder mobility: Tight shoulders can throw off your push-up form. Incorporate dynamic stretches and shoulder openers into your warm-up.
Inconsistent training: Strength builds through repetition. Training upper body exercises 2-3 times per week gives your muscles time to adapt and recover.
Quick Recap
If you’re struggling with push-ups, you're not weak. You're just undertrained, and that's something you can change.
Start with incline push-ups to build foundational strength, then progress to knee push-ups to reduce body weight while maintaining form. Once you've built control and stability, move to traditional push-ups.
Focus on engaging your chest, shoulders, triceps, and core throughout every variation. Train consistently 2-3 times per week and trust the process. With time, your push-ups won't just become strong, smooth, and stable.
This article is intended for general informational purposes only and does not address individual circumstances. It is not a substitute for professional advice or help and should not be relied on to make decisions of any kind. Any action you take upon the information presented in this article is strictly at your own risk and responsibility!